Building a ChatGPT client using Rust with Makepad
Learn how to implement a cross-platform application from scratch with Rust and the Makepad framework
The Rust ecosystem is making significant strides in developing first-class tools for building production-ready applications compatible with major platforms. While there's still work to be done to match the developer experience offered by other tech stacks, we can already explore our options. You'll be impressed by what Rust can accomplish today.
This is the first post in a series that explores how to create cross-platform applications with Makepad, a notable application framework in the Rust community. It is also one of the key projects under the Robuis initiative. Although it's still evolving and some aspects are being fine-tuned for general production readiness, we can now create impressive applications in just a few steps.
Create a new Makepad application
Let’s dive into it! First, create a new binary project using cargo:
cargo new mychat
cd mychat/
Now, we want to add makepad as a dependency.
cargo add makepad-widgets --git https://github.com/makepad/makepad --branch rik
We are now ready to create the necessary elements for an empty application to run. This requires modifying the existing main.rs and adding a few lines.
The src/main.rs file should contain the following:
fn main() {
    mychat::app::app_main()
}
And the src/lib.rs file:
pub mod app;
The src/apps.rs file is the actual entrypoint for Makepad applications. Here is our first version for this file:
1 use makepad_widgets::*;
2
3 live_design! {
4 import makepad_widgets::base::*;
5 import makepad_widgets::theme_desktop_dark::*;
6
7 App = {{App}} {
8 ui: <Window> {
9 window: {inner_size: vec2(800, 600)},
10 pass: {clear_color: #000}
11 }
12 }
13 }
14
15 app_main!(App);
16
17 #[derive(Live, LiveHook)]
18 pub struct App {
19 #[live]
20 ui: WidgetRef,
21 }
22
23 impl LiveRegister for App {
24 fn live_register(cx: &mut Cx) {
25 makepad_widgets::live_design(cx);
26 }
27 }
28
29 impl AppMain for App {
30 fn handle_event(&mut self, cx: &mut Cx, event: &Event) {
31 let scope = &mut Scope::empty();
32 self.ui.handle_event(cx, event, scope);
33 }
34 }
You can test our new application by executing the cargo run command. For now, you should see an empty window.
Understanding our application's anatomy
Looking at the code in src/app.rs, we can see various sections. One section includes a call to the live_design! macro, provided by Makepad. This is where we define the UI components and layout of our application.
Defining a top-level block named App is essential. The behavior of this App element, which represents the entire application, is determined by the Rust struct App. We'll delve into this shortly. Note that our application has only one Window widget instance in the App definition, representing the "empty window" you see when running the application.
So, how would we go about displaying a "Hello world!" message? It's simply a matter of adding a Label widget instance inside the Window block.
3 live_design! {
6
7 App = {{App}} {
8 ui: <Window> {
9 window: {inner_size: vec2(800, 600)},
10 pass: {clear_color: #000}
11
12 // Adding a label displaying some text
13 body = {
14 <Label> {
15 margin: 40,
16 text: "Hello World!"
17 draw_text: {
18 color: #000,
19 }
20 }
21 }
22 }
23 }
24 }
If you modified the application while it was running, you may have noticed that the changes were immediately reflected. This is thanks to Makepad's built-in Live Design feature which automatically detects UI related changes and "hot reloads" the GUI without any recompilation.
All UI elements should be defined within a block named body, which is specified in the Window widget.
Let's take a deeper look at the Rust code section of the src/app.rs file:
56 app_main!(App);
57
58 #[derive(Live, LiveHook)]
59 pub struct App {
60 #[live]
61 ui: WidgetRef,
62 }
63
64 impl LiveRegister for App {
65 fn live_register(cx: &mut Cx) {
66 makepad_widgets::live_design(cx);
67 }
68 }
69
70 impl AppMain for App {
71 fn handle_event(&mut self, cx: &mut Cx, event: &Event) {
72 let scope = &mut Scope::empty();
73 self.ui.handle_event(cx, event, scope);
74 }
75 }
The Rust code in this file is connected to the application's live UI code via the app_main macro (line 56). Makepad then recognizes the App struct as the one representing your application, and everything is tied together.
The LiveRegister trait must be implemented (lines 64-68) because the framework needs to know the locations of other live_design blocks to load them. Currently, we're only including the live_design block included in makepad-widgets, giving us access to framework-provided widgets like Window and Label. However, as your project expands, you'll likely define other parts of your application in different files.
Finally, the AppMain trait must also be implemented, at least minimally, as we've done (see lines 70-75). For now, we've implemented the handle_event function, which describes what happens when the user interacts with the application. The line self.ui.handle_event(cx, event, scope); is important as it invokes the handle_event handler function in the internal widget instances, such as our label instance.
In makepad, if you implement a handle_event() function, you effectively take control over event handling and propagation. Thus, you must explicitly pass events down into each subwidget (or "child" widget) within a widget, if you want each subwidget to be aware of the event and have the ability to handle or respond to it.
This gives you ultimate power over how events propagate throughout different UI widgets/components in the application.
A crucial aspect to note in Makepad is the existence of a Draw event. This event is triggered when elements on the screen need rendering. If we fail to pass all events to child elements, they will not display because this event will not reach them.
Building the user interface for our chat
We aim to create a basic version of a ChatGPT client, so let's begin by designing a simple interface. It should include a text input field for the user's prompt, a submit button to send the input to the ChatGPT API, and a list of messages to display the conversation.
For simplicity, we'll implement these features directly in our existing app.rs file. In reality, larger applications would distribute different parts across multiple files. We'll cover how to organize larger applications effectively in future posts.
Let's start by defining a general layout and adding the text input field and submit button.
2 live_design! {
5
6 App = {{App}} {
7 ui: <Window> {
10
11 body = {
12 height: Fill,
13 width: Fill,
14 margin: {top: 40, bottom: 40, left: 100, right: 100},
15
16 show_bg: true,
17 draw_bg: {
18 color: #330
19 }
20
21 flow: Down,
22 spacing: 20,
23
24 messages = <View> {
25 height: Fill,
26 width: Fill,
27 margin: 20,
28 }
29
30 prompt = <View> {
31 height: Fit,
32 width: Fill,
33 margin: 20,
34 spacing: 10,
35
36 prompt_input = <TextInput> {
37 height: Fit,
38 width: Fill,
39 padding: 10,
40 empty_message: "Type a message...",
41 }
42
43 send_button = <Button> {
44 height: Fit,
45 width: Fit,
46 padding: 10,
47 text: "Send",
48 }
49 }
50 }
51 }
52 }
53 }
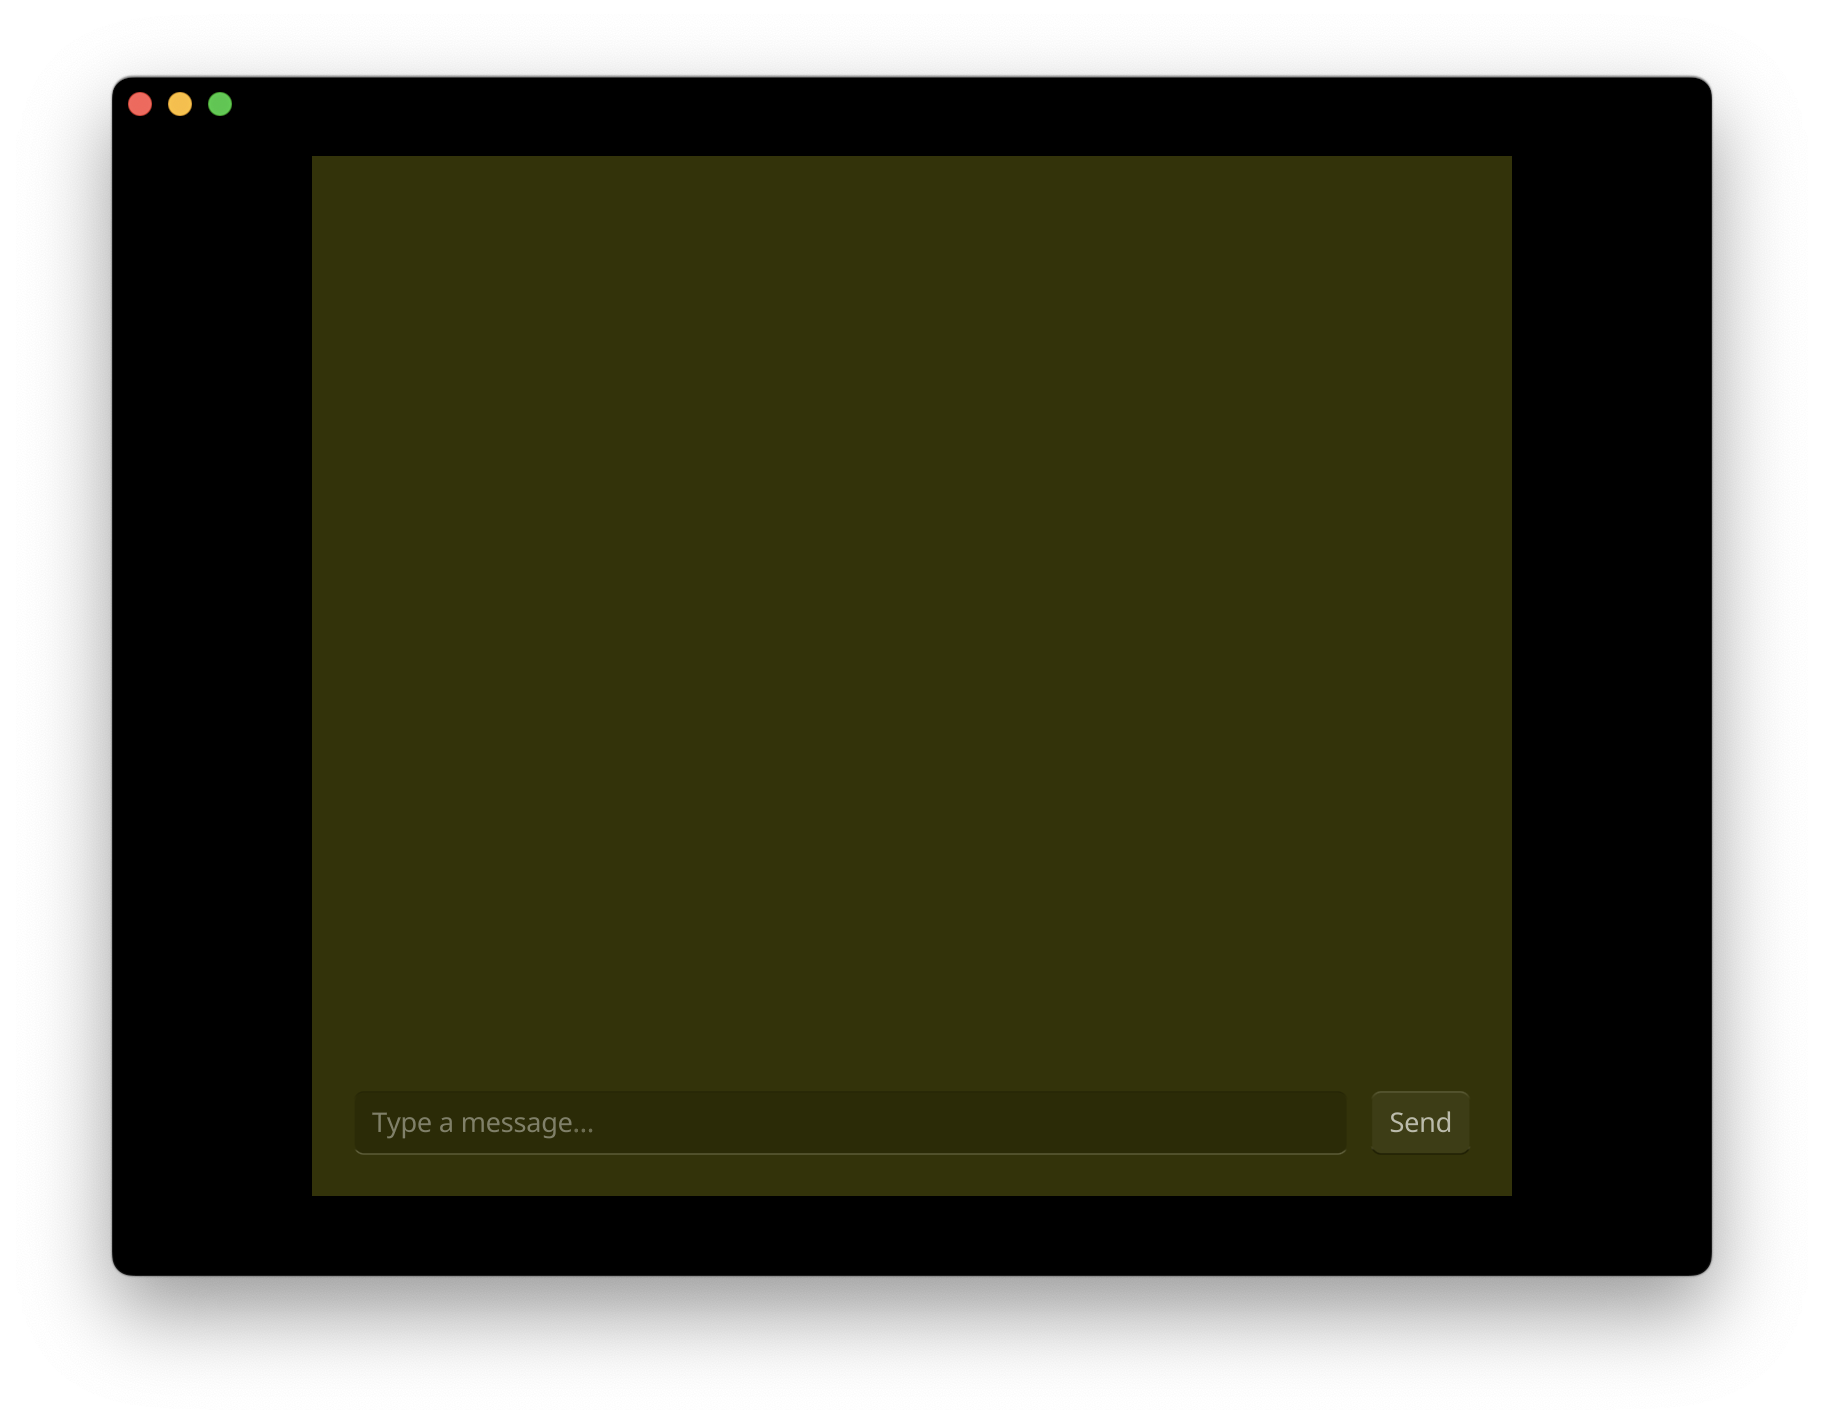
We have replaced all our body block. If you run the application you should see the following:
We arranged our layout using one of the Makepad's fundamental building blocks: the View widget. One view can have a list of children elements to render in our interface. In our case, we added two nested views and configured the parent to have them vertically organized (indicated by flow: Down in line 21).
Those two children views are identified as messages (line 24) and prompt (line 30). Though we're not using those identifiers yet, they will be necessary for reference in the Rust code later. Observe that the first one uses height: Fill and the second height: Fit. This succinctly conveys that the messages section should take up all available vertical space, with each message taking only the minimum amount of vertical space required to fit the message content in., excluding the area required for the prompt view. The prompt view's size relies solely on its inner content.
A common source of issues when working with Makepad is when you have a view sized with
Fit, but the inner content usesFill. This can cause something to not be displayed at all. When a widget usesFill, it needs to know the parent's size beforehand to calculate its own size. Conversely, when a widget is sized withFit, it needs to calculate the space of its content, which must be calculated without knowing the parent's size.
Here's an alternate way to organize our live_design code:
2 live_design! {
5
6 Messages = <View> {
7 // Empty for now
8 }
9
10 Prompt = <View> {
11 spacing: 10,
12
13 <TextInput> {
14 height: Fit,
15 width: Fill,
16 padding: 10,
17 empty_message: "Type a message...",
18 }
19
20 <Button> {
21 height: Fit,
22 width: Fit,
23 padding: 10,
24 text: "Send",
25 }
26 }
27
28 App = {{App}} {
29 ui: <Window> {
32
33 body = {
45
46 messages = <Messages> {
47 height: Fill,
48 width: Fill,
49 margin: 20,
50 }
51 prompt = <Prompt> {
52 height: Fit,
53 width: Fill,
54 margin: 20,
55 }
56 }
57 }
58 }
59 }
This approach makes our App easier to read at first glance. These are specific parts of our user interface that have been assigned the aliases Messages (lines 6-8) and Prompt(10-26) and can be referred to from other points in the DSL. See into the body definitions and check how Messages (line 46) and Prompt (line 51) are instantiated.
We've opted to extract almost everything into these named UI blocks. However, it's worth noting that we still define (or override) the height, width, and margin where we use Messages and Prompt (see lines 46-48 and 52-54). This is because these values form part of the layout rules we establish in conjunction with the parent view. But, Makepad is highly flexible, allowing you to override as much content as desired to accommodate your needs in various ways.
Implementing the interaction
Currently, our application is limited to displaying user interface elements. Interaction is restricted to the text input, with no response when you click the Send button. Let's enhance this interface.
We need to make some changes to our UI code. We'll add some labels to the Message widget to display responses. We'll also add element identifiers, allowing us to reference them from Rust code later. Check the highlighted lines to spot the elements with identifiers.
2 live_design! {
5
6 Messages = <View> {
7 height: Fill,
8 width: Fill,
9 padding: 20,
10
11 flow: Down,
12 spacing: 20,
13
14 user_message_bubble = <RoundedView> {
15 visible: false,
16
17 height: Fit,
18 width: Fill,
19 padding: 10,
20 draw_bg: {
21 color: #222
22 }
23 user_message = <Label> {
24 height: Fit,
25 width: Fill,
26 }
27 }
28
29 model_message_bubble = <RoundedView> {
30 visible: false,
31
32 height: Fit,
33 width: Fill,
34 padding: 10,
35 draw_bg: {
36 color: #222
37 }
38 model_message = <Label> {
39 height: Fit,
40 width: Fill,
41 }
42 }
43 }
44
45 Prompt = <View> {
46 height: Fit,
47 width: Fill,
48 margin: 20,
49 spacing: 10,
50
51 message_input = <TextInput> {
52 height: Fit,
53 width: Fill,
54 padding: 10,
55 empty_message: "Type a message...",
56 }
57
58 send_button = <Button> {
59 height: Fit,
60 width: Fit,
61 padding: 10,
62 text: "Send",
63 }
64 }
96
98 }
Note we are using visible: false in some views to hide the messages bubbles (lines 15 and 30). We plan to toggle the visibility once we have some messages to display.
Now we can add the Rust logic to implement the “send button”.
114 impl AppMain for App {
115 fn handle_event(&mut self, cx: &mut Cx, event: &Event) {
116 // Added this line
117 self.match_event(cx, event);
118
119 let scope = &mut Scope::empty();
120 self.ui.handle_event(cx, event, scope);
121 }
122 }
123
124 impl MatchEvent for App {
125 fn handle_actions(&mut self, cx: &mut Cx, actions:&Actions){
126 if self.ui.button(id!(send_button)).clicked(&actions) {
127 // Capture the text input value
128 let user_prompt = self.ui.text_input(id!(message_input)).text();
129
130 // Set the text of the user message label
131 self.ui.label(id!(user_message)).set_text(&user_prompt);
132 self.ui.view(id!(user_message_bubble)).set_visible(true);
133
134 // Simulate a model response
135 let model_response = "Hello, I am a model response!";
136 self.ui.label(id!(model_message)).set_text(model_response);
137 self.ui.view(id!(model_message_bubble)).set_visible(true);
138
139 self.ui.redraw(cx);
140 }
141 }
142 }
Let's examine each of these code blocks in detail. First, we added a call to self.match_event(cx, event) in line 117, which allows us to use the simpler form of Event matching/handling. This requires us to implement the MatchEvent trait for the App struct, which we can then use to check for and handle events like a Button click.
Next, we implement handle_actions to handle the clicked action emitted by the button when the user clicks it (see lines 125-141). The key idea in Makepad is that widgets consume events from other sources and then can emit actions as needed to communicate with other widgets. In this case, the button instance already received and handled a click event and has emitted a related clicked action.
We rely on the clicked(&actions) function (line 126) to check if the received actions were actually emited by this button instance.
You may notice how we are relying on the identifiers we have in our live_design counterpart. Things like self.ui.text_input(id!(message_input)), self.ui.label(id!(user_message)) and self.ui.view(id!(model_message_bubble)). This is the Makepad query system for UI elements from Rust code, which is very confortable to use. Just remember you need to use the appropriate function depending on the widget type you’re looking for. In other words, self.ui.view(id!(message_input)) won’t return anything because the message_input id was used for a TextInput rather than a View.
As a final note, Makepad has a drawing mode which is quite explicit. So, it is our call to indicate to the framework that there were changes in the labels and views instances that needs to be redraw. Hence, we have an invocation to do it: self.ui.redraw(cx), in the line 139. This is a very simple way to “redraw everything” that is not the most efficient way if you have a much more elaborated UI where only a tiny portion has changed, but it is probably a good way to start for now. Nothing stops you to try later to invoke redraw in the individual instances of Label, View and TextInput as necessary.
Since we have changed Rust code we are required to recompile our application and run it again to see the changes. Hopefully, you will notice how fast Makepad applications recompile! This is a luxury to have in the Rust ecosystem thanks to the amount of care the Makepad team puts on it.
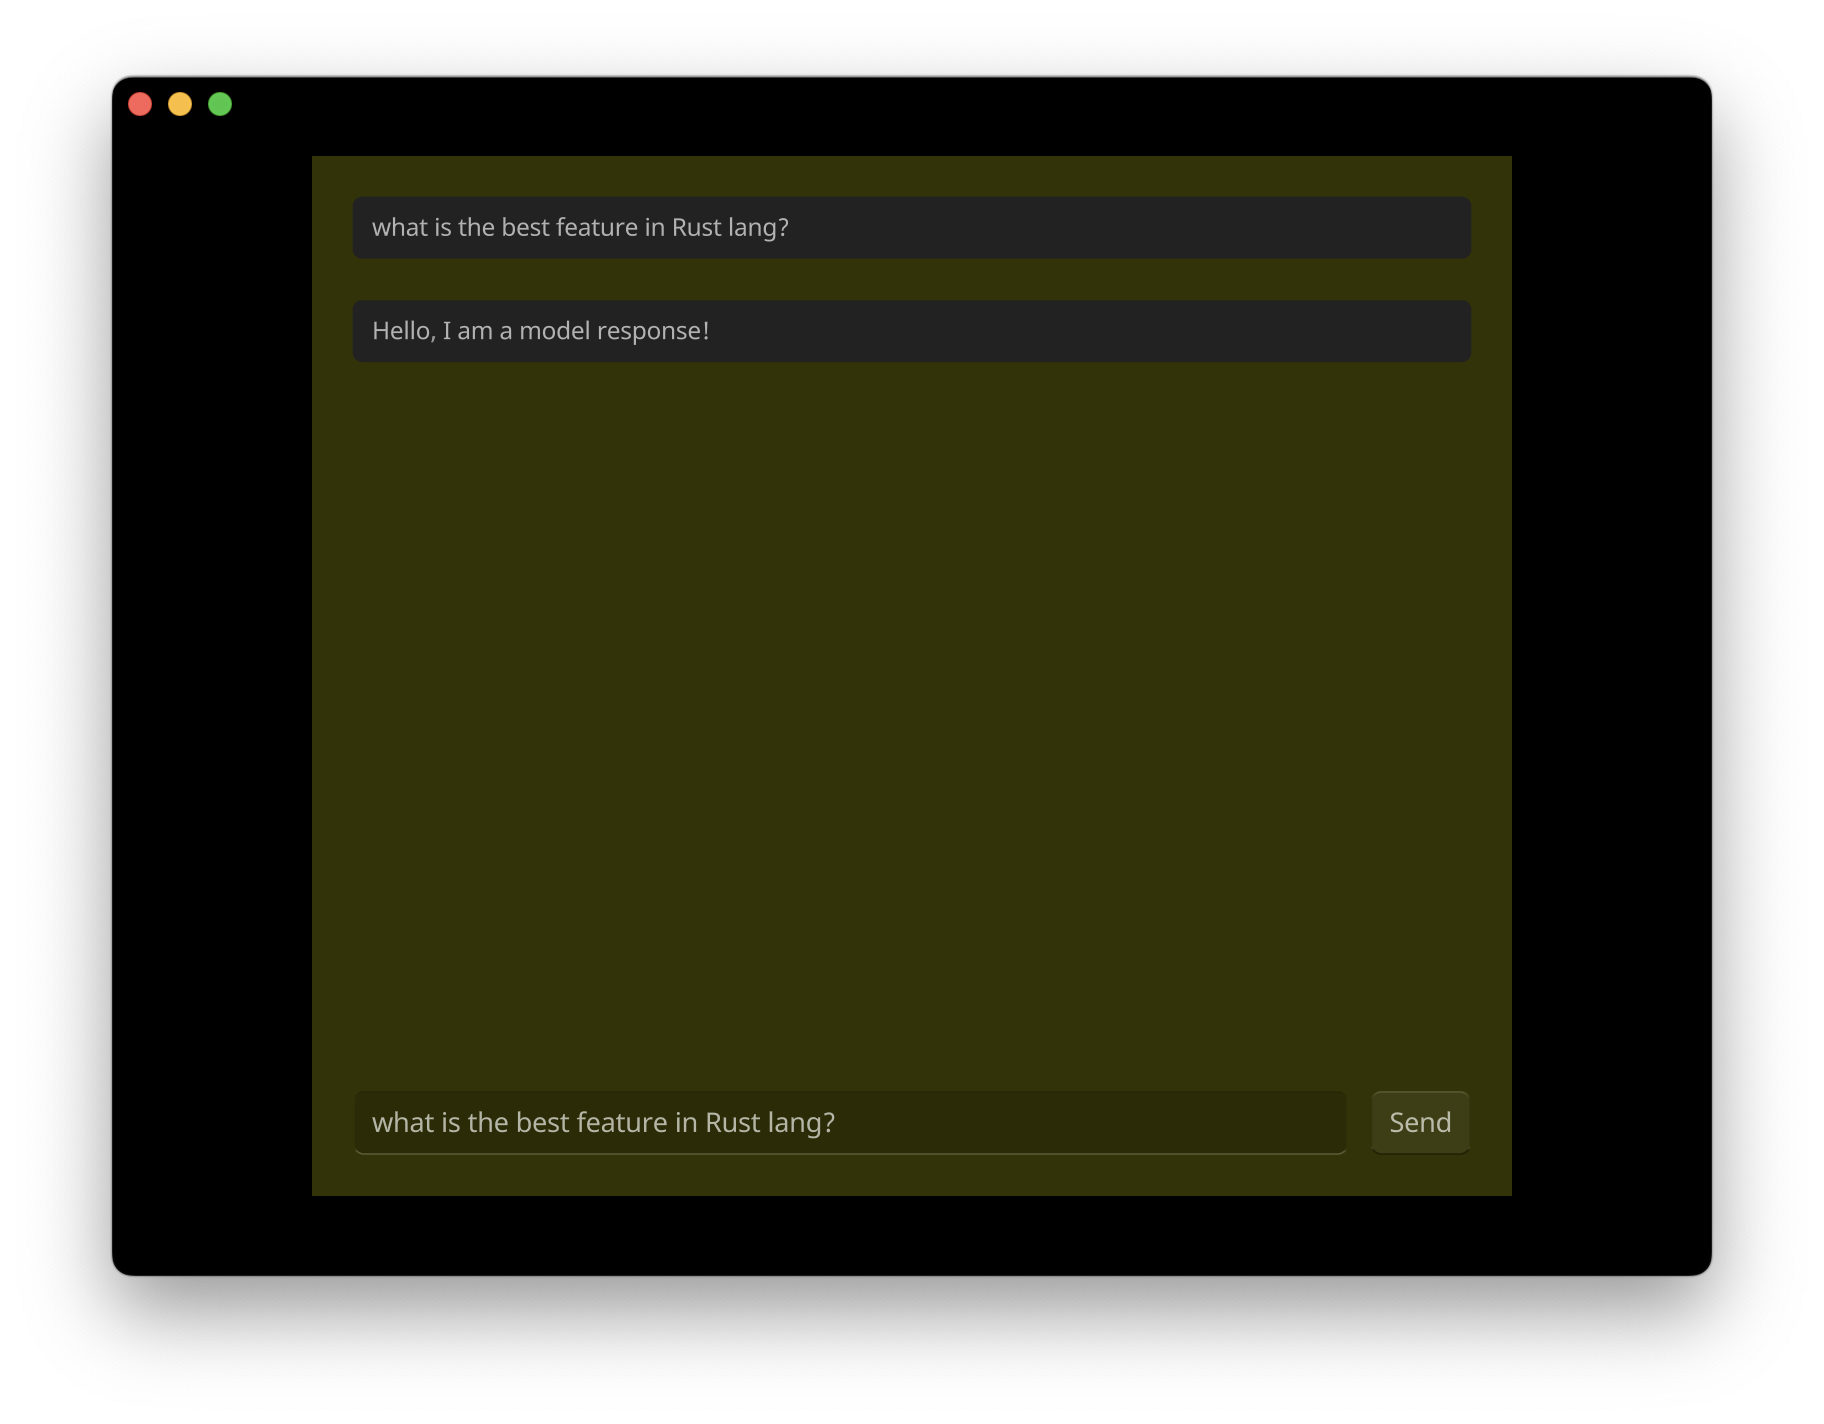
It is working! We need to have a model delivering smarter responses now 🙂
ChatGPT interaction
It’s time to bring real conversation content to our app. We’re going to use the ChatGPT public API, so you will need to generate a key by signing into platform.openai.com. Note the number of allowed requests is based on your current usage tier. Using the free tier, you may have to wait a bit while testing because you only get 3 requests per minute. In any case, our implementation will catch error responses and display them so the user always knows what's going on.
Once you have your API key, let’s implement the request to obtain a model response, by following the official documentation.
1 use makepad_widgets::*;
2 use makepad_micro_serde::*;
3
125 impl MatchEvent for App {
126 fn handle_actions(&mut self, cx: &mut Cx, actions:&Actions){
127 if self.ui.button(id!(send_button)).clicked(&actions) {
128 // Capture the text input value
129 let user_prompt = self.ui.text_input(id!(message_input)).text();
130
131 // Set the text of the user message label
132 self.ui.label(id!(user_message)).set_text(&user_prompt);
133 self.ui.view(id!(user_message_bubble)).set_visible(true);
134 self.ui.redraw(cx);
135
136 // Replacing the hardcoded response with a real one
137 send_message_to_chat_gpt(cx, user_prompt);
138 }
139 }
140 }
141
142 fn send_message_to_chat_gpt(cx: &mut Cx, message: String) {
143 let completion_url = "https://api.openai.com/v1/chat/completions".to_string();
144 let request_id = live_id!(SendChatMessage);
145 let mut request = HttpRequest::new(completion_url, HttpMethod::POST);
146
147 request.set_header(
148 "Content-Type".to_string(),
149 "application/json".to_string()
150 );
151
152 request.set_header(
153 "Authorization".to_string(),
154 "Bearer <YOUR_ACCESS_KEY>".to_string()
155 );
156
157 request.set_json_body(ChatPrompt {
158 messages: vec![Message {content: message, role: "user".to_string()}],
159 model: "gpt-3.5-turbo".to_string(),
160 max_tokens: 100
161 });
162
163 cx.http_request(request_id, request);
164 }
165
166 #[derive(SerJson, DeJson)]
167 struct ChatPrompt {
168 pub messages: Vec<Message>,
169 pub model: String,
170 pub max_tokens: i32
171 }
172
173 #[derive(SerJson, DeJson)]
174 struct Message {
175 pub content: String,
176 pub role: String
177 }
178
Remember to use your own OpenAI access key in the line 154
With the addition of send_message_to_chat_gpt() (lines 142-164), we can send a request to the ChatGPT API server. Note that we’re not yet handling the response so we can focus on the request part. The cx.http_request (line 163) is the mechanism in Makepad to issue regular HTTP requests in a non-blocking manner. This ensures that our application UI won’t be blocked while the response is still pending.
The HttpRequest::set_json_body() function (line 157) receives a struct representing the JSON format expected by the server. Note that we define the ChatPrompt struct (line 167) for this purpose, and then derive SerJson and DeJson on them to automatically generate efficient JSON parsing logic for them. You can think of those traits as a simpler version of Serde, which we are importing in the line 2.
Let’s now receive the responses and update the user interface:
114 impl MatchEvent for App {
129
130 fn handle_network_responses(
131 &mut self,
132 cx: &mut Cx,
133 responses: &NetworkResponsesEvent
134 ) {
135 let label = self.ui.label(id!(model_message));
136 for event in responses {
137 match &event.response {
138 NetworkResponse::HttpResponse(response) => {
139 match event.request_id {
140 live_id!(SendChatMessage) => {
141 if response.status_code == 200 {
142 let chat_response =
143 response.get_json_body::<ChatResponse>().unwrap();
144 label.set_text(
145 &chat_response.choices[0].message.content
146 );
147 } else {
148 label.set_text(&format!(
149 "Failed to connect with OpenAI: {:?}",
150 response.get_string_body()
151 ));
152 }
153
154 self.ui.view(id!(model_message_bubble)).set_visible(true);
155 self.ui.redraw(cx);
156 },
157 _ => (),
158 }
159 }
160 NetworkResponse::HttpRequestError(error) => {
161 label.set_text(
162 &format!("Failed to connect with OpenAI {:?}", error)
163 );
164 self.ui.view(id!(model_message_bubble)).set_visible(true);
165 self.ui.redraw(cx);
166 }
167 _ => ()
168 }
169 }
170 }
171 }
209
210 #[derive(SerJson, DeJson)]
211 struct ChatResponse {
212 pub id: String,
213 pub object: String,
214 pub created: i32,
215 pub model: String,
216 pub usage: Usage,
217 pub choices: Vec<Choice>,
218 pub system_fingerprint: Option<String>,
219 }
220
221 #[derive(SerJson, DeJson)]
222 pub struct Usage {
223 prompt_tokens: i32,
224 completion_tokens: i32,
225 total_tokens: i32,
226 }
227
228 #[derive(SerJson, DeJson)]
229 struct Choice {
230 message: Message,
231 finish_reason: String,
232 index: i32,
233 logprobs: Option<String>,
234 }
Makepad's MatchEvent trait has a handle_network_responses() function, and by implementing it (lines 130-171) we now have a way to network-related events. This function is quite straightforward once we define a ChatResponse struct (line 211) to represent the JSON response format coming from ChatGPT.
Once we retrieve the chat message from the response, we set the corresponding Label instance's text (line 144). We also make sure that the parent view is visible (line 154) and everything gets redrawn (line 155). The parent visibility was hidden because we only want to display the messages bubbles once we have the messages
If everything goes well with the ChatGPT API server, you should see an interaction like the following one:
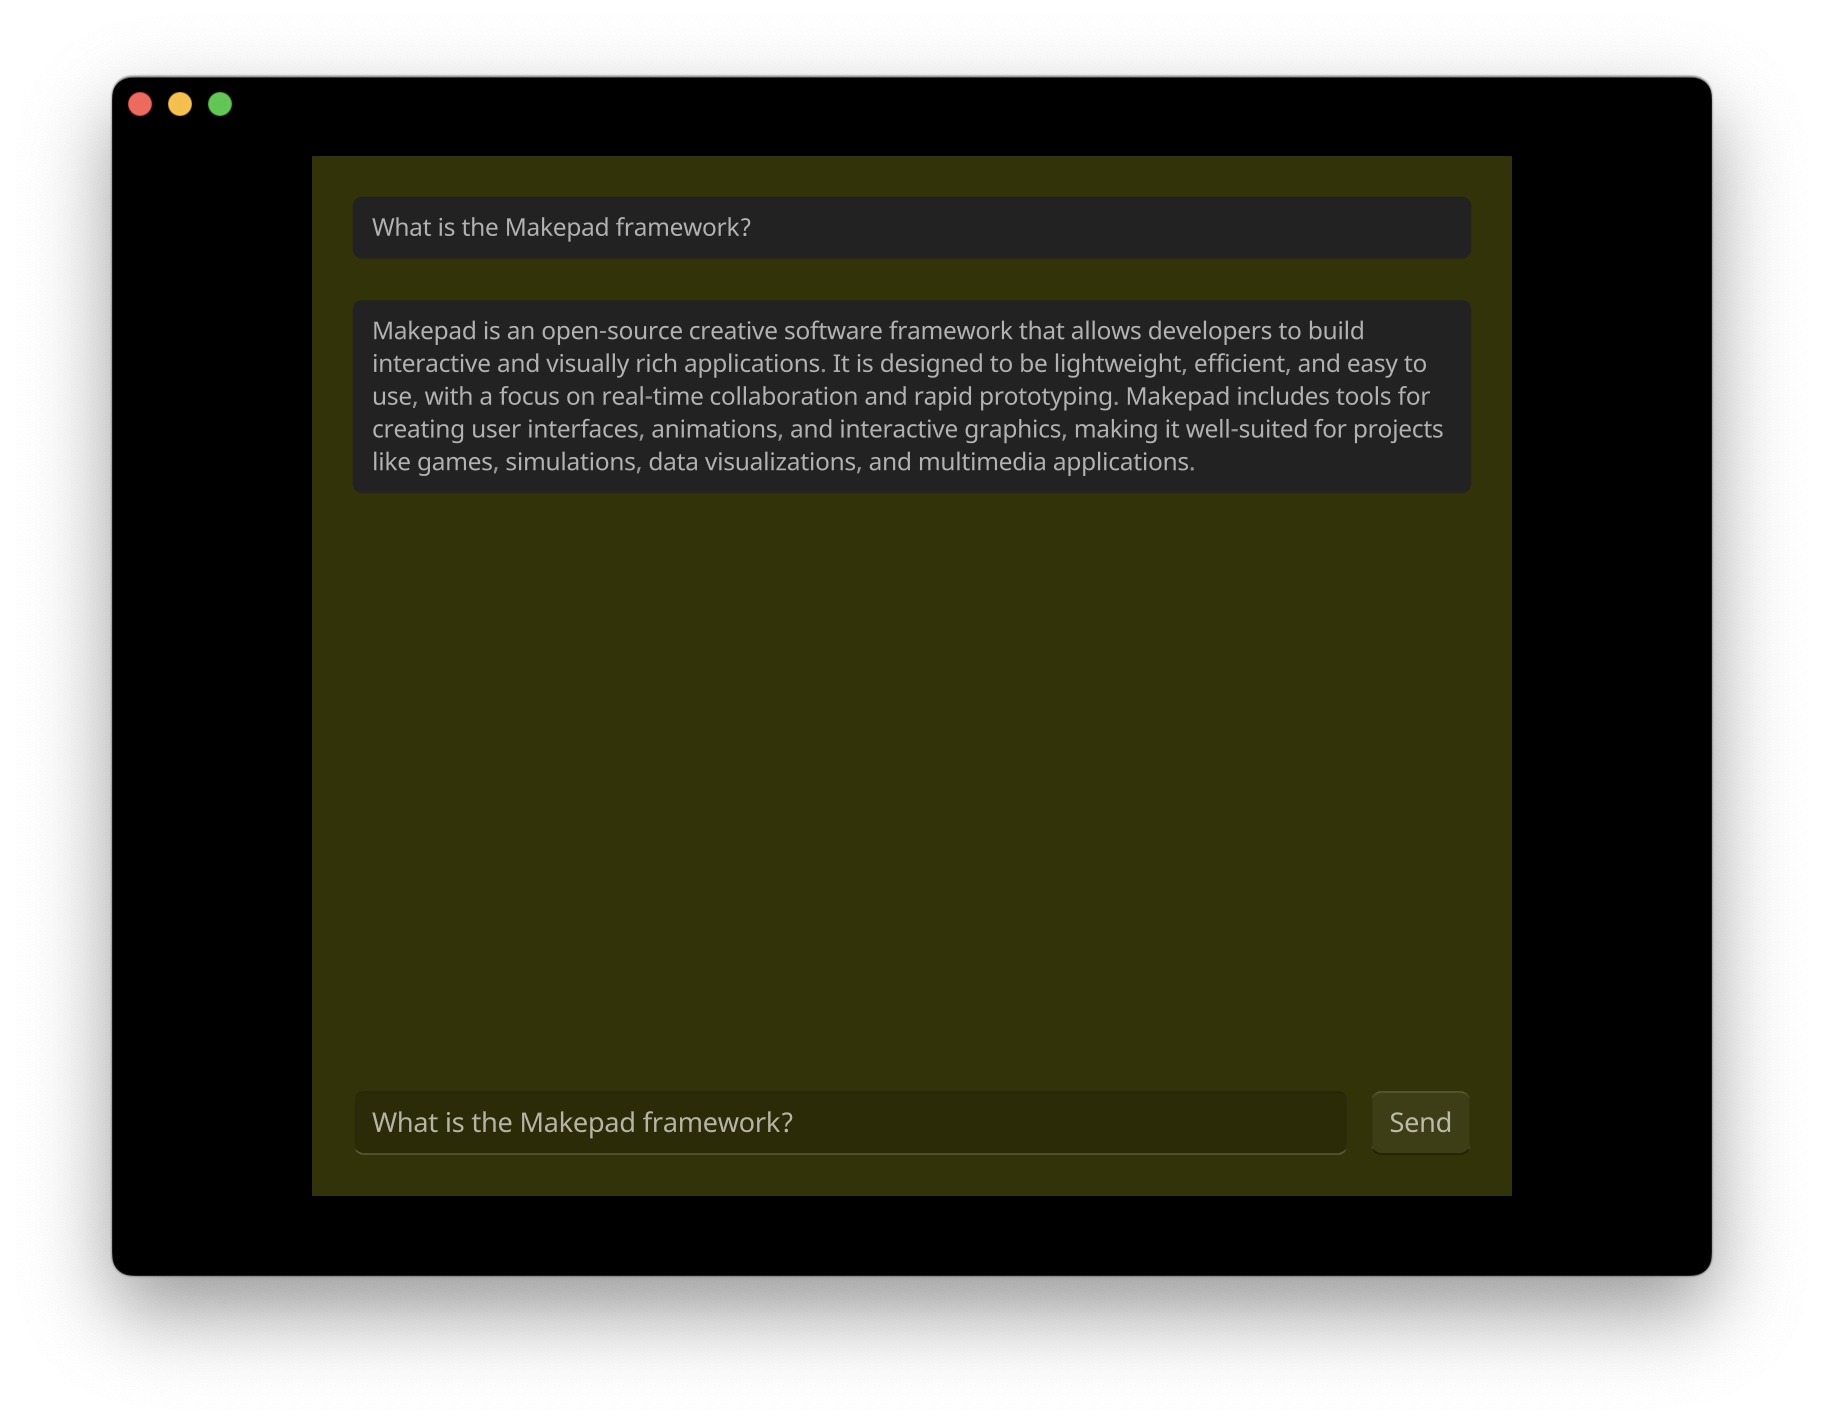 This is what ChatGPT knows about Makepad... 🙂
Wrapping up
Let's take a look at what we have achieved in a few steps. We have a basic application with an easy-to-modify look and feel. In just a few dozen lines of code, we made a working chat client that shows real responses from ChatGPT models. Now, we invite you to try different platforms beyond the native desktop platform that we demonstrated in this post. Follow the instructions in the Makepad README to see how to test this application in Android, iOS, and web.
In a future post, we'll cover how to implement a list of messages to make this app really feel like a true interactive chat app.
Have fun hacking with Makepad and Rust!
By: Jorge Bejar
https://x.com/jmbejar
https://mastodon.social/@jmbejar
https://github.com/jmbejar
Published: 2024-06-12